TL;DR
Placement and layering matter more than foam for quieting a closet rig. Moving your setup to another room is the most effective, and proper ventilation keeps it cool. Combine these tactics for a quieter, more comfortable workspace.
Ever feel like your tiny closet turns into a boxy echo chamber the moment you start recording? Or maybe your loud, high-powered rig feels like a buzzing hive you can’t quiet down? The truth is, the best way to tame noise isn’t just stuffing foam everywhere—it’s about where you put it, how you position your gear, and making sure heat and sound don’t turn your closet into a sauna or a speaker. This guide peels back the layers of acoustic treatment, placement secrets, and how to keep your rig cool, so you get crisp, clear sound without sacrificing your sanity.
If you’re serious about making a closet work as a vocal booth or a low-noise AI workstation, understanding these principles saves you time, money, and frustration. We’ll cover the concrete steps to optimize your space, from mic placement to layered materials, and even how to keep that hot machine from turning your closet into an oven. Ready to turn your tiny space into a sound fortress? Let’s go.
Acoustic dampening
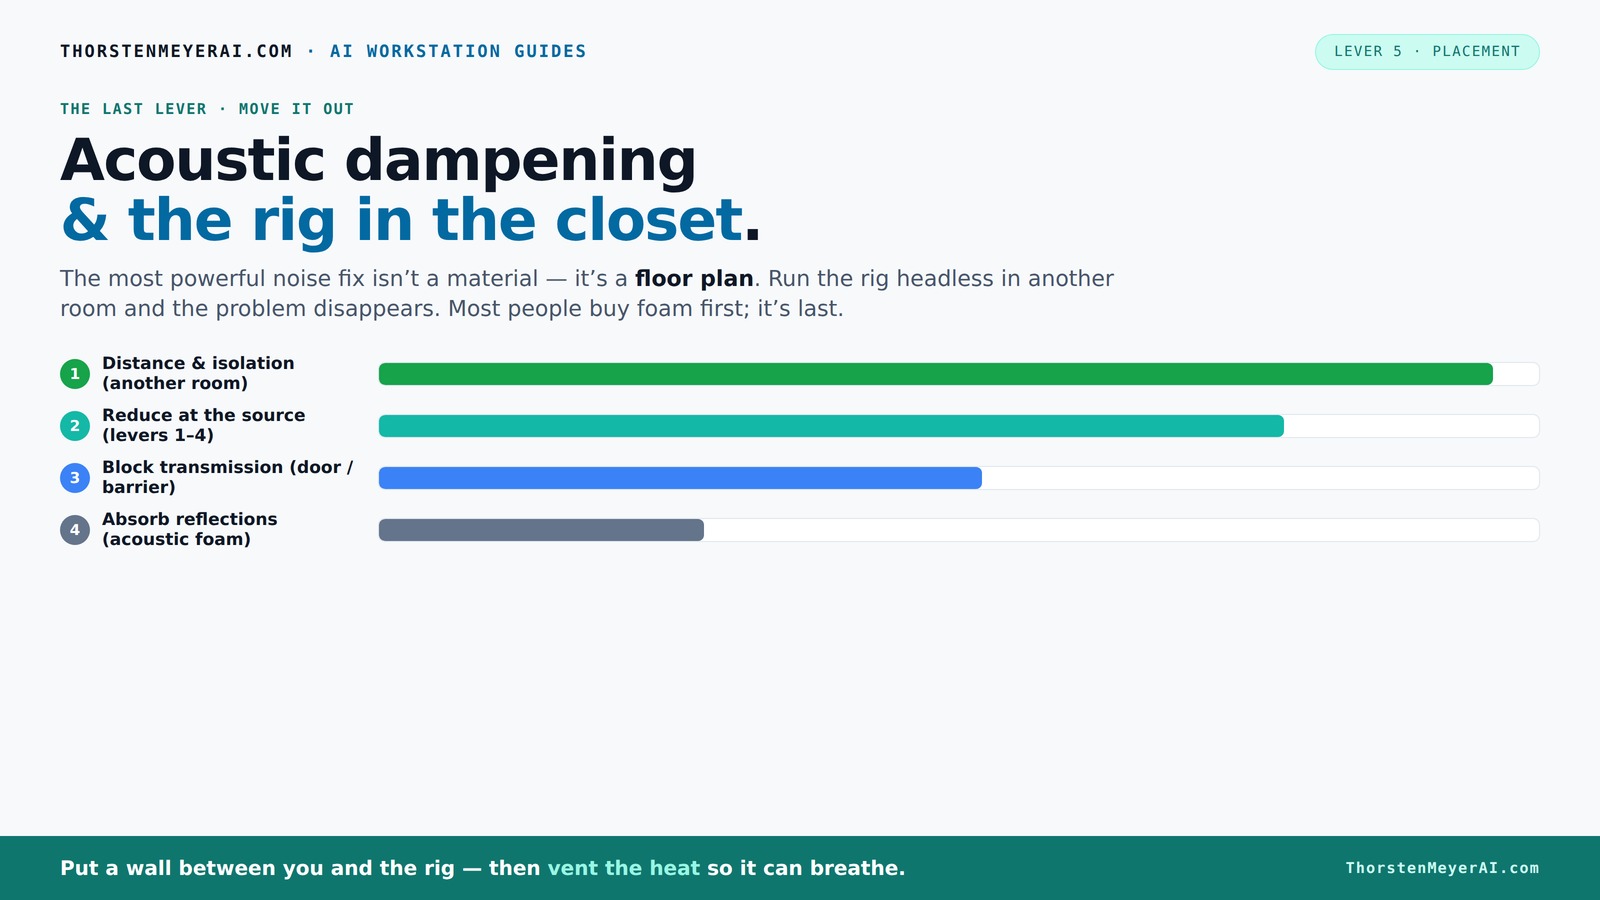
& the rig in the closet.
The most powerful noise fix isn’t a material — it’s a floor plan. A rig you can’t hear because it’s in another room beats any amount of foam. Tap the approaches in Part 1 to see what actually works.
(another room)
(levers 1–4)
(door / barrier)
(acoustic foam)
Contain the noise, not the heat
Key Takeaways
- Prioritize moving your rig to another room over adding foam; distance is the most effective noise reducer.
- Layer materials—foam, blankets, rugs—to target different reflection and absorption issues for a cleaner sound.
- Place the mic at reflection points, away from hard surfaces, for clearer recordings.
- Seal gaps around the door and use blankets or acoustic treatments to block sound leaks.
- Ensure proper ventilation—active exhaust or ducting—to keep your rig cool and prevent noise from heat buildup.

Focusound 52 Pack Acoustic Foam Panels 1" x 12" x 12" Sound Proof Foam Panles Soundproofing Noise Cancelling Wedge Panels for Home Office Recoding Studio with 300PCS Double-Side Adhesive
Soundproofing - Acoustic foam panels triangular grooves structure for better noise absorption, helps to reduce and absorb unwanted...
As an affiliate, we earn on qualifying purchases.
As an affiliate, we earn on qualifying purchases.
Why Placement and Layering Beat Just Adding Foam
Acoustic dampening isn’t about slapping foam on every wall. It’s about strategic placement and layering. Foam absorbs reflections and reduces echo inside the space, but it doesn’t block sound from escaping or coming in. That’s where placement becomes king.
Think of your closet like a tiny concert hall. If you place absorption panels at the main reflection points—like the wall behind your mic or the ceiling above—you cut down on flutter echo and boxiness. Layering multiple materials—blankets, rugs, foam—targets different sound issues, creating a more natural, less reverberant environment. You can learn more about acoustic dampening and placement for your space.
For example, a DIY closet booth with foam on the walls, a thick blanket over the door, and a rug on the floor will drastically improve sound quality. But without sealing gaps or controlling heat, it’s only half the battle.
Understanding why placement and layering matter is crucial because improper placement can leave reflective surfaces untreated, leading to muddier recordings. Layering different materials addresses various sound frequencies and issues—foam for mid-high frequencies, blankets for low frequencies, and sealing gaps for preventing sound leaks. The tradeoff is that more layers can reduce room volume and airflow, so balancing treatment with ventilation is key.

Aokeo Studio Recording Microphone Isolation Shield, Pop Filter.High density absorbent foam is used to filter vocal. Suitable for blue yeti and any condenser microphone recording equipment
♪【Eliminate Interference】♪: The inner side of the microphone isolation shield is made of absorbing cotton insulation that can...
As an affiliate, we earn on qualifying purchases.
As an affiliate, we earn on qualifying purchases.
The Best Spot for Your Mic & Reflection Points
Your first step? Place the mic where it avoids reflective surfaces. Position it a few inches away from walls and avoid pointing directly at hard surfaces like the closet door or walls. For more tips on mic placement and reflection points, visit placement tips.
Next, identify the main reflection points. The wall behind your mic, the ceiling above, and nearby hard surfaces bounce sound back into the mic. Use a mirror trick: sit in front of the mic and have a friend move a mirror along the walls. Wherever you see the mic’s reflection is where you want absorption or dampening.
For example, if your mic faces a closet wall, place a foam panel about 6 inches behind it and a few inches above. This setup not only reduces flutter echo but also creates a more direct sound path, minimizing the chances of sound bouncing around the space and degrading your recording quality. Proper placement reduces the need for excessive treatment elsewhere, saving space and materials while improving clarity.
Understanding where to position your mic and how to identify reflection points is essential because reflections cause comb filtering and echo, which muddy your recordings. When you treat these points effectively, you get a cleaner, more professional sound, which is especially important in small, reflective environments.

VTRETU Router Cooling Fan for Computer Cooler Audio Video Network Cabinet Server Cooling Project Equipment and Workstation DC 5V USB Power 120mm 360mm Fan with Switch
【better after-use experience】 Temperature reduction provides an expected longevity extension and higher performance of a critical network component,These...
As an affiliate, we earn on qualifying purchases.
As an affiliate, we earn on qualifying purchases.
Why Small Rooms Need Special Treatment — Bass Traps & Corners
Small closets are notorious for bass buildup and standing waves. You’ll notice muffled lows or boominess. To fix this, add bass traps in the upper corners and near the floor. These traps soak up low frequencies that tend to resonate in tiny spaces. Learn more about bass trapping and corner treatment.
For instance, a closet with parallel walls creates low-end peaks. Installing thick bass traps at the corners can flatten these peaks, resulting in a more balanced sound. If space permits, consider foam or DIY panels in the upper corners, especially where low frequencies tend to concentrate.
Addressing bass issues is vital because in small rooms, low frequencies tend to accumulate and create muddiness, making vocals sound boomy and unnatural. Proper placement of bass traps in corners is a tradeoff: it can slightly reduce the usable space but significantly improve sound clarity. When done right, bass traps can reduce muddiness by up to 50%, leading to clearer, more professional-sounding recordings.
Understanding the importance of corners and bass trapping helps you achieve a balanced frequency response, preventing low-end buildup that can distort your recordings and make mixing more difficult.
AudioSilk Acoustic Panels, 4 Pack ROOM KIT, Large, 46" x 23", Black
REDUCE NOISE: Struggling with poor acoustics in your recording/rehearsal space? AudioSilk panels give you professional, studio grade sound...
As an affiliate, we earn on qualifying purchases.
As an affiliate, we earn on qualifying purchases.
How to Seal the Gaps & Treat the Door for Quietness
The door is usually the weakest link in soundproofing a closet. Gaps around the frame, cracks, and air leaks let sound escape and noise seep in. Seal these with weatherstripping, acoustic sealant, or draft-proofing strips. For detailed door sealing strategies, see door and gap treatment tips.
For example, a simple weatherstrip kit around the door frame can cut noise leakage by 70%. Adding a heavy blanket or a specially designed door seal can make a huge difference. In some cases, hanging a thick curtain or a moving blanket over the door creates a barrier that absorbs reflections and blocks sound.
Don’t forget the floor—placing a rug or foam mat underneath helps reduce reflections and prevents sound from bouncing underneath your setup. Sealing gaps effectively reduces noise leakage and prevents sound from entering or leaving the space, which is especially important if you’re recording sensitive audio or trying to keep external noise out.
The tradeoff of sealing gaps is that it can slightly reduce ventilation, so you should balance soundproofing with airflow needs, especially if your setup generates heat.
Layered Materials & DIY Tricks for Better Sound Control
One thick layer of foam isn’t enough—layering multiple materials works wonders. Combine acoustic panels, blankets, rugs, and even clothing to absorb different frequencies and reflections.
A common DIY trick: hang moving blankets on walls and ceiling, add foam panels at reflection points, and place a thick rug on the floor. This multi-layer approach creates a dense barrier against sound. Each layer targets specific issues—foam for high frequencies, blankets for midrange, rugs for low-end reflections—creating a more comprehensive soundproofing environment.
This layered approach is effective because different materials resonate differently across frequencies. The tradeoff is that multiple layers can reduce room size and airflow, so it's important to plan your setup to optimize sound absorption without sacrificing ventilation or workspace comfort.
When you understand how different materials work together, you can customize your treatment to your needs, achieving a much cleaner sound with less effort and expense.
Ventilation & Comfort: Keeping Your Rig Cool in a Tiny Closet
Most closet setups trap heat. A sealed space with no airflow will turn your high-powered rig into a toaster. The solution? Proper ventilation.
Passive vents, ducting, or quiet exhaust fans keep air moving. For example, a small, quiet exhaust fan mounted in a vent hole can pull hot air out without adding noise. Some DIYers use ducting to route heat outside the closet, keeping temperatures in check.
Maintaining a temperature below 85°F is crucial because excessive heat can cause hardware throttling, reduce performance, and increase noise from fans ramping up. Using an AIO cooler that exports heat outside can also help, especially if you’re running a GPU with 600W or more of heat output. Proper ventilation not only keeps your hardware cool but also prevents the buildup of hot, stale air that can degrade your equipment’s lifespan and performance.
Balancing noise reduction with effective cooling is a tradeoff: too much airflow can introduce noise, so choosing quiet fans and strategic ducting is essential for a comfortable, high-performance setup.
Frequently Asked Questions
Does acoustic foam soundproof a closet?
Acoustic foam mainly absorbs reflections and reduces echo inside the space but does not block sound from escaping. For true soundproofing, sealing gaps and adding mass are necessary, but foam alone won’t fully isolate the room.Where should I put foam or panels in my closet booth?
Place foam at reflection points—behind the mic, on the ceiling, and on side walls. Focus on areas where sound bounces back to the mic. Use mirror trick or listen for echo to find these spots.Do I need bass traps in a tiny closet?
Yes, especially in the upper corners where low frequencies tend to build up. Installing bass traps can reduce muddiness and give your recordings a fuller, clearer sound.How do I keep my rig cool in a small space?
Use active ventilation—quiet exhaust fans, ducting, or even small AIO coolers that export heat outside. Proper airflow prevents heat buildup, which can cause throttling and noise from fans ramping up.How much wall coverage do I need for effective treatment?
Aim for at least 20-25% of the walls covered with absorption panels, focusing on reflection points and corners. Layering materials increases effectiveness without covering every inch.Conclusion
Transforming a tiny closet into a quiet, effective workspace isn’t about slapping foam on every wall. It’s about smart placement, layered treatments, and making sure your rig breathes. When you treat the space strategically and keep your machine cool, your recordings will sound professional—and you’ll enjoy a quieter, more comfortable work environment.
Remember: the best noise solution is often to get your rig out of the room altogether. But if that’s not possible, layering, sealing, and ventilation are your best allies. Your perfect closet setup is just a few smart choices away.